Last updated: August 12, 2026
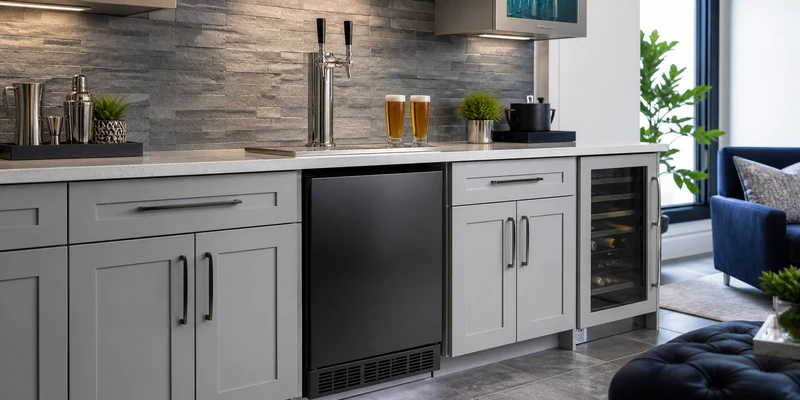
An undercounter kegerator is the difference between a bar with an appliance next to it and a bar with draft built in. The cabinet disappears under the counter, the tower rises out of the countertop, and the whole setup reads as intentional, which is exactly what a wet bar or basement bar build deserves.
But undercounter is not just a size class, it is an engineering requirement. A kegerator that lives inside cabinetry has nowhere to dump its compressor heat except out the front, and buying a freestanding unit for a built-in spot is the most expensive mistake in this category. This guide covers the ventilation rule that governs everything, the measurements that matter, and the units genuinely built for the job.
This article contains affiliate links. If you buy through them, we may earn a commission at no extra cost to you. Learn more.
Quick Answer
What should you look for in an undercounter kegerator?
- Front ventilation, explicitly listed as built-in capable. This is non-negotiable for an enclosed install; rear-venting units overheat inside cabinetry.
- Cutout dimensions that fit your opening with the manufacturer’s specified clearances, measured before ordering, including the countertop hole for the tower.
- Keg capacity that matches your plans: many undercounter units take a half barrel, but low-profile models may be limited to smaller formats.
Built-In Checklist: Verify These Before Ordering
Every row here can be checked from the product listing and a tape measure. Undercounter installs fail on paperwork, not on plumbing.
| What to check | Why it matters | What to look for |
|---|---|---|
| Ventilation direction | Enclosed cabinets trap compressor heat | Front-facing vent grille and the words “built-in capable” in the listing |
| Cutout dimensions | The unit must fit the opening with required clearances | Width, depth, and height against your opening, plus the manufacturer’s clearance spec |
| Counter thickness and tower | The draft tower mounts through the countertop | A tower hole you can drill cleanly through your counter material, sized per the manual |
| Keg capacity | Low cabinets can rule out taller formats | Stated compatibility with half barrel, quarter, sixtel, or Cornelius kegs |
| Door swing and access | Kegs load from the front in a built-in | Room for the door to open fully and a clear path to slide a heavy keg in |
| Power location | Cords should not cross walkways | An outlet inside or adjacent to the cabinet bay |
If keg formats are new to you, our kegerator size guide covers the dimensions of every common keg before you commit to a cabinet height.
Why Front Ventilation Is the Whole Category
A refrigeration compressor produces heat, and that heat has to go somewhere. Freestanding kegerators exhaust it through the back and sides, which works fine with open air around the cabinet and fails immediately inside a cabinet bay: the trapped heat raises the interior temperature, the compressor runs harder and produces more heat, and the spiral ends with foamy beer and a shortened compressor life. Front-venting units route the airflow through a grille under the door, so the enclosure never matters.
This is also why “fits under a counter” in a listing is not the same as “built-in capable.” Plenty of freestanding units are short enough to slide under a counter, and they will work there only if the sides and back stay open. If your build encloses the unit on three sides, treat front ventilation as a hard filter and read the listing until you find it stated plainly.
Undercounter Kegerators Built for the Job
How we chose: we compared undercounter and built-in capable kegerators on ventilation design, cutout flexibility, keg capacity, and how consistently owners report stable temperatures after installation. Selections lean on manufacturer specifications and recurring themes in customer reviews rather than any hands-on trial of our own.
Expect the built-in premium: front-venting refrigeration costs more to make than freestanding, and the price difference is the engineering, not the badge. It is still far cheaper than replacing a cooked freestanding unit and redoing the cabinetry around it.
🏆 Best Overall
A front-venting undercounter kegerator from the brand best known for built-in capable compact refrigeration, with a full dispensing kit and a cabinet that takes a half barrel. The straightforward choice for a wet bar or kitchen island build.

🌤️ Best for Outdoor Kitchens
An outdoor-rated undercounter unit that combines front ventilation with weather-resistant construction, for islands and counter runs on the patio. The only responsible pick when the bar lives outside.

🍺 Also Great
A built-in capable dual tap unit that puts two faucets on the tower, running two sixtels side by side for variety on draft. The upgrade when one style on tap stops feeling like enough.

Planning the Install
Measure three times: the opening, the route to the opening, and the countertop. The unit needs its stated cutout dimensions plus clearances, the path from the front door to the bar has to pass the boxed cabinet, and the counter needs a clean hole for the tower with the beer line run protected inside it. Drill the tower hole per the manual for your counter material, and dry-fit the tower before the unit slides in, because adjusting a misplaced hole afterward means working blind under the counter.
Leave yourself service access. Kegs load frequently, CO2 tanks swap occasionally, and lines need cleaning on the usual rhythm, between kegs or every couple of weeks, as covered in our guide to cleaning kegerator lines. A built-in that requires disassembling cabinetry for a keg change gets used less every month, so make sure the door opens fully and a full keg can slide straight in from the front. If you are designing the whole bar around the unit, our wet bar cabinet guide covers the cabinetry side of the equation.
Common Mistakes to Avoid
- Building in a freestanding unit. The single most common and most expensive error. No front vent, no enclosure. Read the listing until ventilation direction is explicit.
- Measuring the opening but not the route. A unit that fits the bay still has to get through doorways, down basement stairs, and around corners in its box.
- Forgetting tower clearance above the counter. Faucets need pouring room under shelves and upper cabinets. Leave comfortable clearance for a pint glass at an angle under the faucet.
- Ignoring keg loading. A half barrel is heavy and awkward. Plan a straight, unobstructed slide from the floor into the cabinet.
- Skipping the leak test after tower install. Every connection you assembled, tower, shank, coupler, gets soapy water under pressure before the cabinetry closes around it.
- Putting the outlet across the room. Power belongs in or beside the bay. Cords through cabinet walls invite pinches and code trouble.
Where to Go From Here
If your bar corner is open rather than enclosed, a freestanding unit does the same job for less, and our kegerator guide sorts the whole category by situation. Building outdoors instead? The weather side of the equation, ratings, placement, and winter, is covered in our outdoor kegerator guide.
Frequently Asked Questions
What is the difference between an undercounter and a freestanding kegerator? Ventilation. Undercounter units vent through the front so they can be enclosed by cabinetry; freestanding units vent through the back and need open air around them. Height alone does not make a unit built-in capable.
Can I put a regular kegerator under a counter? Only if the back and sides stay open to the room. Fully enclosed in a cabinet bay, a rear-venting unit overheats, pours foam, and wears out its compressor early.
Do undercounter kegerators fit a full half barrel? Many full-height undercounter models do; lower-profile units may be limited to quarter barrels, sixtels, or Cornelius kegs. Check the stated keg compatibility, and see our kegerator size guide for the formats.
Can I install the draft tower through any countertop? Most counter materials can be drilled with the right hole saw and care, but stone counters are a job for a fabricator. Follow the manufacturer’s hole specification and protect the beer line inside the tower run.
Are undercounter kegerators harder to maintain? The routine is the same, lines cleaned between kegs or every couple of weeks, but access matters more. Plan the install so kegs, the CO2 tank, and the lines can be reached without dismantling anything.
The Bottom Line
An undercounter kegerator is a ventilation decision before it is anything else: front-venting, built-in capable, and sized to your cutout with the manufacturer’s clearances. Verify keg capacity and loading access, drill the tower hole per the manual, and leak-test before the cabinetry closes in. Done right, it is the most polished way to put draft beer in a home bar.