Last updated: August 12, 2026
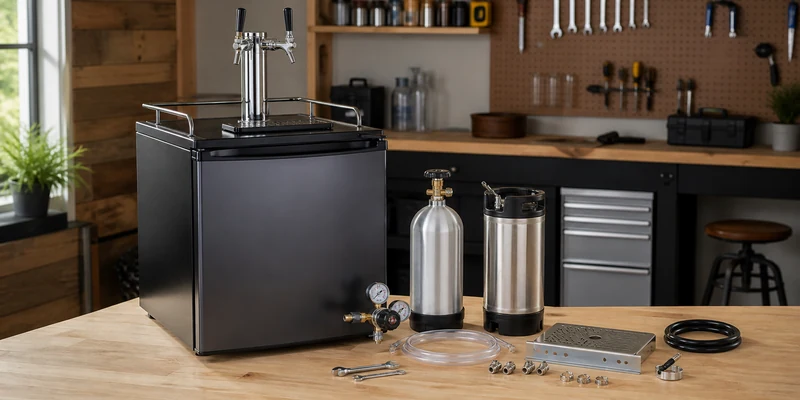
A kegerator conversion kit turns a refrigerator you already own, or a cheap secondhand one, into a working draft system. It is the DIY route into draft beer at home: one box with the faucet, coupler, regulator, and lines, one afternoon with a drill, and a fridge that pours a proper pint for your next gathering.
The appeal is obvious, but the kits themselves vary more than the listings suggest. Some include the CO2 tank, some do not. Some mount the faucet through the door, others come with a full stainless tower for the top of the cabinet. And homebrewers need entirely different fittings from people tapping commercial kegs. This guide sorts the kit types, flags what each box actually contains, and walks through the picks that owners consistently get working on the first try.
This article contains affiliate links. If you buy through them, we may earn a commission at no extra cost to you. Learn more.
Quick Answer
What should you look for in a kegerator conversion kit?
- A complete kit: faucet, shank or tower, dual gauge regulator, coupler, beer and gas lines, and ideally the CO2 tank, which many kits sell separately.
- The right fitting for your beer: a Sankey D coupler for commercial kegs, ball lock disconnects for homebrew Cornelius kegs.
- A donor fridge that actually fits a keg standing upright, with the coupler attached; the compressor hump in many mini fridges is the usual dealbreaker.
Conversion Kit Types at a Glance
Every kit does the same core job, getting beer from a keg through a cold line to a faucet, but the mounting style and fittings decide which one belongs on your fridge.
| Kit type | How it mounts | Best for |
|---|---|---|
| Door mount kit | Faucet shank through a hole drilled in the fridge door | Simplest install; upright fridges and larger mini fridges |
| Tower conversion kit | Stainless tower bolted through the top of the cabinet | The classic kegerator look; chest freezers and dedicated builds |
| Homebrew kit (ball lock) | Door or tower mount, with ball lock disconnects instead of a coupler | Cornelius kegs filled with your own batches |
| Dual tap kit | Two faucets on one tower or two door shanks, split gas line | Two kegs side by side in a larger donor fridge |
| Picnic tap kit | No drilling; hand faucet on a short line inside the fridge | Testing the waters before committing to a drill |
Not sure whether a conversion beats buying a ready-made unit? Our comparison of a kegerator versus a mini fridge conversion weighs the cost, effort, and end result honestly.
Check the Donor Fridge Before the Kit
The kit is the easy half of the project; the fridge is where conversions succeed or die. A keg is a tall, wide cylinder, and it needs to stand upright with the coupler and a loop of beer line above it. Measure the interior height and depth of your candidate fridge, then compare it to the keg format you plan to use: a sixtel or a Cornelius keg fits far more fridges than a half barrel ever will. Our kegerator size guide lists the dimensions for every common format.
Two fridge features cause most failed projects. The first is the compressor hump, the raised step in the floor of most mini fridges, which leaves too little flat floor for a keg to stand on. The second is in-door cooling lines or wiring: some fridges route refrigerant or electrical runs through the door or the side walls, and drilling into them ends the project on the spot. Check the service documentation for your model before making holes, and when in doubt choose the tower route through the top only if you can confirm the lid is clear.
What drilling means for the fridge
Be honest with yourself about the tradeoff: drilling a fridge generally ends its warranty and its resale story. That is a fine trade for a secondhand unit or an old garage fridge, and a worse one for a new appliance. This is part of why the conversion route makes the most sense as a project, not just a savings play.
Conversion Kits That Work on the First Try
How we chose: we compared widely available conversion kits on completeness, hardware quality at the faucet and regulator, clarity of instructions, and how consistently owners report leak-free installs. Selections lean on manufacturer specifications and recurring themes in customer reviews rather than any hands-on trial of our own.
One warning that applies to every kit: check whether the CO2 tank is included and whether it ships full. Most tanks ship empty by regulation and need a fill or exchange at a welding gas or homebrew supplier, so plan that errand before tap day.
🏆 Best Overall
A complete door mount conversion kit from the brand that dominates this category, including the CO2 tank, dual gauge regulator, Sankey coupler, and all lines. Everything in one box, with instructions owners consistently call clear.

💛 Best Value
The same core hardware without the CO2 tank, for anyone who already has a tank or wants to source one locally. A cheaper entry that keeps the important parts, the regulator and coupler, at full quality.

🗼 Best for a Finished Look
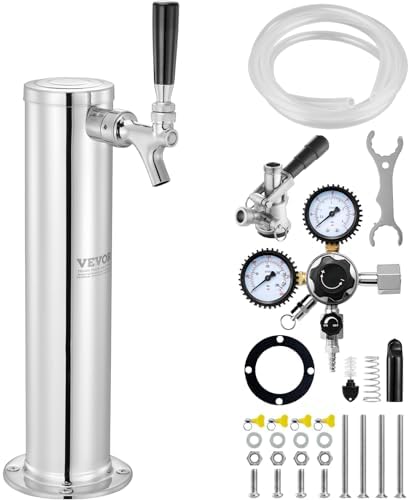
A tower conversion kit with a polished stainless draft tower and chrome faucet that turns a plain fridge or keezer build into something that looks factory made. The route for anyone building a bar around the unit.
Kits for Homebrew and Multi-Tap Builds
Homebrewers should skip Sankey kits entirely: Cornelius kegs use ball lock or pin lock posts, and the right kit comes with matching disconnects on the gas and beer sides. If your fridge is large enough for two kegs, a dual setup is barely more work than a single, since one tank and a split gas line feed both; a look at our dual tap kegerator guide helps you decide whether two faucets are worth it before you drill the second hole.
🧪 Best for Homebrew
A ball lock conversion kit with disconnects, lines, and regulator matched to Cornelius kegs. Turns any sufficiently tall fridge into a serving fridge for your own batches.

🍺 Also Great
A dual faucet tower kit with a two-product regulator setup, for pouring two beers from one converted fridge. The natural upgrade once a single-tap conversion proves itself.

Installation: The Short Version
A door mount conversion is a two to three hour project for a careful first-timer. The sequence: confirm the drill zone is free of lines and wiring, drill the shank hole with a hole saw sized to the kit, mount the shank and faucet, connect the beer line from shank to coupler, connect the gas line from regulator to coupler, and mount or place the CO2 tank, outside the fridge if the kit allows, which saves interior space. Then pressurize the system and leak-test every joint with soapy water before the keg ever goes in; a slow gas leak is the most common rookie loss, and it empties a tank silently.
Once it pours, treat the conversion like any draft system: steady temperature, patient regulator adjustments, and a real cleaning rhythm. Lines need flushing between kegs or every couple of weeks, and our guide to cleaning kegerator lines applies to converted fridges exactly as it does to factory units.
Common Mistakes to Avoid
- Buying the kit before measuring the fridge. The compressor hump and interior height disqualify more donor fridges than any other factor. Measure with the keg format and coupler height in mind.
- Drilling blind. Cooling lines run through doors and walls in many models. Confirm the safe zone for your exact fridge before the hole saw touches it.
- Assuming the tank is included and full. Many kits exclude the tank, and tanks ship empty. Sort the fill before tap day.
- Skipping the leak test. Soapy water on every fitting under pressure takes five minutes and saves a silently emptied CO2 tank.
- Mixing up fittings. Sankey couplers do not fit Cornelius kegs. Match the kit to the kegs you will actually tap.
- Letting the first foamy pour panic you. New systems settle. Get the temperature right and adjust pressure in small steps before changing anything else.
Where to Go From Here
If the measuring and drilling has cooled your enthusiasm, a ready-made unit skips every risk in this article, and our kegerator guide sorts those by situation, from freestanding to built-in. Still torn between the two routes? The head-to-head in kegerator versus mini fridge conversion gives a straight recommendation per type of buyer.
Frequently Asked Questions
What comes in a kegerator conversion kit? A faucet, a door shank or tower, beer and gas lines, a regulator, and a keg coupler. The CO2 tank is the variable: some kits include it, many do not, so check the listing line by line.
Can any fridge be converted into a kegerator? No. The fridge needs enough flat interior floor and height for the keg plus coupler, and a safe drilling zone free of cooling lines. Upright fridges and larger mini fridges qualify most often; compact cube fridges usually do not.
Does converting a fridge void the warranty? Drilling a fridge generally ends its warranty coverage. That is why conversions make the most sense on secondhand or already-aging fridges rather than new appliances.
Do I need a different kit for homebrew kegs? Yes. Homebrew Cornelius kegs use ball lock or pin lock disconnects instead of the Sankey coupler on commercial kegs. Buy a kit that matches your kegs, or add disconnects separately.
Where do I fill the CO2 tank? Welding gas suppliers, homebrew shops, and some sporting goods stores fill or exchange CO2 tanks. Call ahead, since some locations exchange rather than refill your specific tank.
How cold does the converted fridge need to be? Cold enough to hold a steady draft serving temperature, which most working fridges manage on a colder setting. Stability matters more than the exact number, because temperature swings are what cause foam.
The Bottom Line
A kegerator conversion kit is the satisfying, budget-friendly route to draft beer at home, provided the donor fridge fits a keg and can be drilled safely. Buy a complete kit with a quality regulator, match the coupler to your kegs, and leak-test before tap day. Measure first, drill once, and the project rewards you every time you host.