Last updated: August 12, 2026
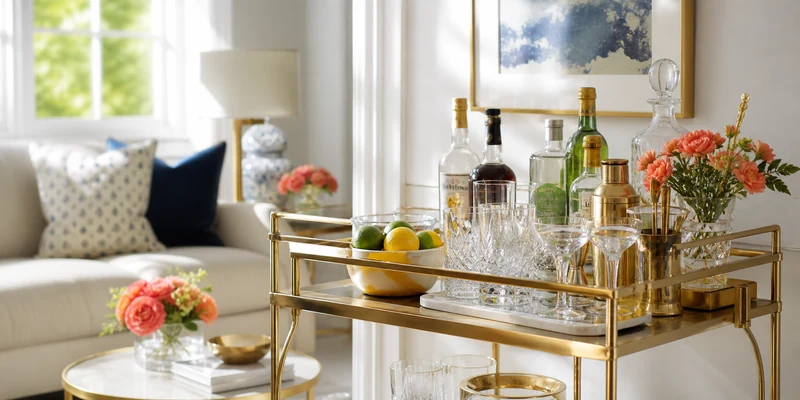
Styling a bar cart is the rare decorating task with a genuinely repeatable method. The carts you admire in interior photos are not the product of a stylist’s mysterious eye; they follow a handful of rules about zones, height, and breathing room that anyone can apply in twenty minutes with the things they already own. The difference between a cart that looks curated and one that looks like a shelf of bottles is arrangement, not budget.
This guide gives you the method as five concrete steps, then goes deeper on what belongs on each shelf, how to keep the cart from sliding back into clutter, and how to swap the look with the seasons without buying a new cart’s worth of props. Grab everything off your cart and start from zero; it is easier than editing in place.
Quick Answer
How do you style a bar cart?
- Work in zones: bottles grouped at the back, tools together on a tray, glassware in matched clusters up front.
- Build a height triangle: tall items at the back corners, medium in the middle, low and small at the front.
- Leave a third of the cart empty. Breathing room is what makes the difference between styled and stuffed.
The Five Step Method
Save this sequence; it works on every cart format, from gold two tier trolleys to slim apartment towers.
- Clear and clean. Take everything off, wipe the shelves, and only bring back what earns its place. Styling on top of clutter fails before it starts, and this is also the moment dead bottles and orphaned glasses leave the cart for the kitchen.
- Set the anchor. Place a tray on the top shelf, slightly off center. The tray is the cart’s focal point and working surface: it corrals the tools, defines where drinks get made, and instantly makes everything on it look intentional instead of scattered.
- Zone the shelves. Bottles group together at the back of the top shelf, tallest against the frame. Tools live on the tray. Glassware clusters by type, upside down or right side up but consistently, toward the front. The bottom shelf takes volume and weight: backup bottles, a bucket, larger items.
- Build the height triangle. Step back and check the silhouette: tall at the back corners, sloping down to small items at the front. If everything is the same height, add a riser under a cluster or hang stemware from a rail; if the top is a wall of tall bottles, thin them out to the best three or four.
- Add life, then edit. One or two non-bar objects make the cart feel styled: a small plant or trailing vine, a candle, a framed print leaning against the wall behind it, a stack of two books under a glass cluster. Then remove one thing. If the cart still looks full, remove another. About a third of the surface should stay empty.
What Goes Where: Shelf by Shelf
The top shelf is the stage and the workbench at once. It gets the anchor tray with tools, the three to five prettiest bottles, and the glassware you actually offer guests, arranged in matched pairs or clusters rather than singles. Odd numbers of objects group better than even ones, and clusters of three, a bottle, a small glass cluster, a plant, are the basic unit interior stylists build from.
The bottom shelf carries the weight, literally and visually. Heavier and taller items sit low, which keeps the cart stable and the eye moving upward toward the styled top. This is also where honest storage lives: the backups, the bucket, the seltzer. If the lower shelf tends toward chaos, a basket tames it while adding texture, which is a two for one small rooms especially appreciate. What deserves shelf space at all is its own question, and our bar cart essentials checklist is the sensible packing list to edit against.
Styling by Cart Type and Room
The method holds everywhere, but the accents shift with the cart. A gold and glass cart wants restraint, since the cart itself sparkles: clear glassware, white or green accents, and plenty of empty shelf. A woven rattan cart is already texture, so it takes greenery and warm tones naturally and resists chrome. A clear acrylic cart displays everything at once, so color grouping of bottles matters more, and a slim apartment cart lives or dies by editing, because crowding shows fastest on the smallest stage.
Room context sets the ceiling too. In a dining room the cart can go maximal and festive; in a living room it should echo the room’s existing palette rather than introduce a new one; in a small studio the styled cart may be the room’s single decorative gesture, which argues for doing it properly. If you are still choosing the cart itself, our guide to the best bar cart by style and space is the place to start before the styling begins.
Seasonal Swaps Without a Prop Cupboard
A styled cart drifts stale after a few months, and the fix costs almost nothing: keep the base arrangement and swap the accents. Spring wants a small vase of stems and lighter glassware forward; summer moves the pitcher and highballs up top; fall trades the greenery for amber tones and a candle; winter leans into the festive cart’s natural season with metallics and a bowl of ornaments. Five minutes per season, no storage bin of props required.
The one standing rule across seasons: the working zones stay put. Guests and household members learn where the opener lives and where glasses come from, and a cart that reshuffles its logic every quarter loses the effortless usability that makes it more than decor.
Common Styling Mistakes
- Displaying every bottle you own. The cart is a stage, not an archive. Three to five bottles up top; the rest live in a cupboard.
- Skipping the tray. Without an anchor, even tidy objects read as scattered. The tray is the single highest leverage styling object.
- Uniform height. A skyline of same size bottles is a wall, not an arrangement. Build the triangle: tall back, low front.
- Zero empty space. Fullness reads as clutter no matter how nice the objects are. A third of the surface stays open.
- Mismatched singles everywhere. One lonely glass of each type looks like leftovers. Cluster matched pairs and trios.
- Forgetting the wall behind. The cart plus a print or mirror above it reads as a designed corner; the cart alone reads as parked furniture.
Ready to Put It to Work?
A styled cart invites actual hosting, and the gap between the two is mostly supplies. The bar cart essentials checklist covers the tools and glassware worth owning, without the gadget bloat. If your bar lives behind doors instead of on wheels, the same zoning logic applies inside a cabinet, and how to organize a bar cabinet translates it shelf by shelf.
Frequently Asked Questions
What do you put on a bar cart? A tray with tools, a small curated group of bottles, clustered glassware, and one or two living accents like a plant or candle. Volume and backups go on the bottom shelf or in a cupboard; see the essentials checklist for the full list.
How do you make a bar cart look expensive? Edit hard and group deliberately: fewer, better looking objects, matched glassware in clusters, a tray as an anchor, and a third of the surface left empty. Restraint photographs as luxury far more reliably than any purchase does.
How many bottles should be on a bar cart? Three to five on display is the sweet spot for most carts. Enough to look generous, few enough to arrange, and the rest of the collection stays in closed storage.
Can you style a bar cart without alcohol? Absolutely. The same method styles a coffee and tea cart, a mocktail and mixer setup, or a dessert trolley. Zones, height triangle, breathing room: the rules do not care what is in the bottles.
What goes on the bottom shelf of a bar cart? Weight and volume: backup bottles, a bucket, seltzers, and a basket for the unphotogenic extras. Heavy items low also keeps the cart stable when it rolls.
The Bottom Line
Styling a bar cart comes down to five repeatable moves: clear it, anchor it with a tray, zone the shelves, build a height triangle, and edit until a third of the surface breathes. Swap small accents with the seasons and keep the working zones fixed. It is a twenty minute job with the things you already own, and it is the cheapest room upgrade in the house.